Chalcedony Earrings
About This Design
Time: Approximately 30-60 minutes
Level of Difficulty: Beginner - All Levels
Cost: Varies, depending on materials selected. Approximately $15-25 as shown.
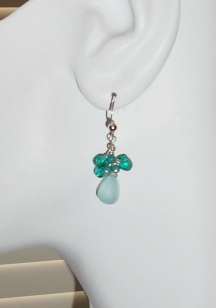
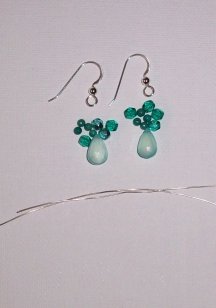
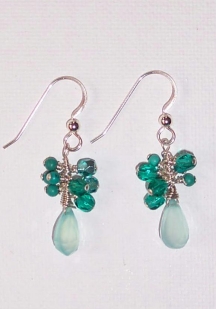
I wanted to showcase some perfect glowing aqua chalcedony
beads. These blue chalcedony earrings feature some fantastic rare
semi-precious gemstone beads, here in a faceted briolette shape.
To bring out the color, I
topped them with a cluster of genuine turquoise rounds and aqua
crystals. Attached to sterling silver french hook
earrings.
Lovely and timeless, this design works great with any large/small
bead combination, so use whatever bead combo you have on hand!
Want to make these earrings, or a variation for yourself? Let's get started!
Step 1
Gather your supplies
- 2 Aqua Blue Chalcedony Briolette Beads. Blue
Chalcedony Briolette Beads for sale on eBay
- 8 small aqua crystal beads
- 8 small turquoise round beads
- 16 Headpins
- Length of sterling silver half hard wire (thin - 26 gauge)
- 2 earwires, french hooks, leverbacks or posts (your choice) I
used sterling silver french hook ear wires in my design
Need Supplies? Check my Jewelry Supply pages to find what you need!
Step 2
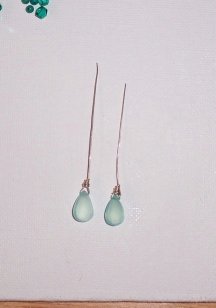
Wire wrap the briolette bead
Cut
several inches of sterling silver wire. Slide the chalcedony
briolette bead into the center of the wire. Bend the ends of the
wire up to meet in the middle at the top of the bead. Follow my
instructions for wire wrapping a briolette to make a closed loop at the
top with a stem. We will attach the other beads to this top of
the wire stem so don't attach it to the earring component just yet.
Step 3
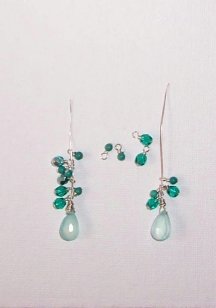
Slide beads on headpins make loops
Next, you will attach four crystals and four turquoise round beads to
the top of each earring (or more if you
like!). Slide a crystal bead onto a headpin, create a loop, and
then slide the loop on the top stem, using a closed loop.
You'll use your round nose pliers to create the closed loop. If
you need help learning to make a loop, follow these instructions.
Repeat, alternating a crystal and turquoise bead until you have attached
all of them to the stem. I attached 8 beads to each
earring--you can do more or less to get the look you like.
Step 4
Close top loop and attach to earring components
Now, we'll make a round loop at the top of the wire
stem, not too far from the top of the other beads, and attach it to the
earring component. Use your round nose piers to form a loop, slide
it through the earring component, then wrap the wire back down around
the stem a few times, creating a secure closed loop.
That's it! Your gorgeous earrings are ready to
wear!
| 