
Gold Chandelier Earrings Project
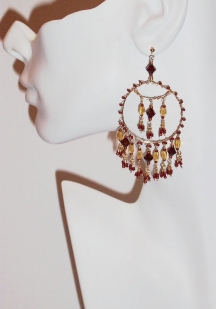
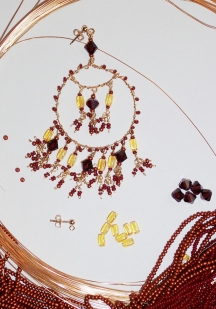
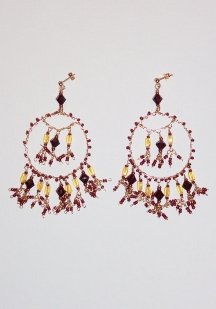
About This DesignTime: Approximately 4-6 hours Level of Difficulty: Advanced (some experience with wire wrapping needed) Cost: Varies, depending on materials selected. Approximately $20-40 as shown. I happen to love chandelier earrings. There is no other piece of jewelry that is so dramatic and eye-catching as a big swingy pair of sparkling earrings. Wear these for a special night on the town when you really want to get attention! These chandeliers are "designer", 100% handcrafted from the wire hoop down to the bead fringe on the bottom. You've seen these earrings sold by famous jewelry designers for upwards of $200 per pair. There is no reason you can't make an equally special pair, using your own beads and creativity to create your one-of-a-kind design. I suggest you use some of your favorite beads on this design, simply because these earrings will take you ALL DAY (whew!) to make, and you want to be happy with the end result. You can certainly use a genuine 14KT gold earring component to finish these if you like, as these earrings are very special and meant to be treasured. Because gold is coming back into fashion, I used the onset of spring and summer as my inspiration and I made this pair in 14KT GF wire, with brick red and copper seed beeds, dark red Swarovski crystals, and yellow citrine beads. I'll be wearing these all summer long! Want to make these earrings, or a variation for yourself? Let's get started! Step 1Gather your supplies
Need Supplies? Check my Jewelry Supply pages to find what you need!
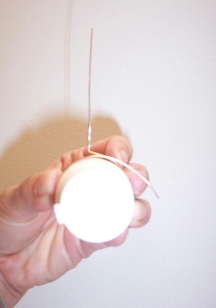
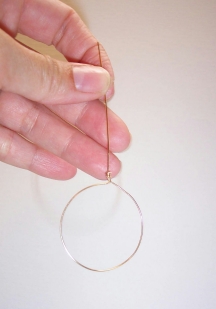
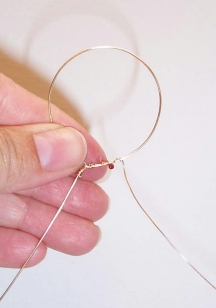
Step 2Prepare main hoop form First, a side note--these earrings take a lot of time and patience. If you don't have some basic wire wrapping experience, this project might be too challenging, so practice your basic loops and wire wrapping chain before attempting this project. Or, feel free to jump right in and try it--just be prepared to waste a little wire in your learning curve (and consider using silver instead of gold if this is your first try, it is less expensive). The first thing we need to do is create two perfect round hoops as the main body of the earrings ( to which we will wrap fine wire and attach our other beads). To create a round shape, use any household item as a form to wrap your wire around. I used a small aspirin bottle. Select a bottle that has the size of hoop you want for your pair of earrings. Wrap the heavier gauge gold wire tightly around the bottle. At the point where the wires cross, bend one end of wire up at a right angle to become the stem (you will attach this to the earring component) and the other end (tail) you will wire wrap around the stem. Wrap the tail around the stem a few times and cut off the excess with your flush cutters. Make both earrings at the same time at this step, so you can be sure they are exactly the same size.
Step 3Wrap fine gold wire and attach seed beads to wire hoop form Cut a long length of thinnest gauge soft wire (at least 12 inches, you don't want to run out). We are going to start at the top of the hoop and begin wire wrapping the thin wire around the hoop form, attaching one seed bead to our hoop form with every other wrap. First, wrap the wire tightly at the top of one side (several revolutions) of the hoop to attach the wire to the hoop form. Next, thread a seed bead onto the wire, wrap around twice to hold the seed bead into place on the top outside of the hoop (hold it in place with your fingers while wrapping). Pull the wire tight, and "eyeball it" to determine how far apart you want your beads to be. This is totally a design decision--depending on how tightly you bunch the seed beads together, you can have more or less beads in your design. However--pay attention to the bottom third of the hoop because you must have an uneven number of loops to attach your beaded fringe. More on this in a second...read to the bottom of this step before beginning. So again, the steps are, attach one seed bead, wrap the wire through and around twice (while holding seed bead in place with fingers), and attach the next seed bead, wrap twice...and so on. Don't worry if you have to start over a couple of times with new wire--the goal is to get uniform wraps, spaced evenly so you have the same number of beads on each earring. I strongly suggest you make both earrings at the same time for this reason--you can get this part out of the way and you are more likely to wrap them the same way in one sitting. At the bottom third of the earring is where you will attach your beads. In order to do this you need to create loops, or spaces, between the thin wire and the wire form hoop. So, eyeball it (or measure and mark it) and when you get to the lower third part of the form where you want to attach your drop beads, start threading two seed beads onto the wire, and make a larger loop with your fingers when wrapping, allowing a gap so you will be able to thread and attach your drop beads in a later step. The reason we are attaching two seed beads instead of one is we will attach the drop beads right in the center of the two seed beads. You need an UNEVEN number of drops for a symmetrical earring with one drop in the center. I ended up with nine loops on the bottom to attach my drop beads. Just keep an eye on the bead and loop spacing so your earring ends up uniform and looks the same on either side. One you get done with the nine drop hoops on the lower third of the earring, return to threading only one seed bead, and work your way back up the other side of the hoop form, to the top where you will wrap your wire tightly in several revolutions and cut off the end. This is the most challenging part of making this earring, so congratulations, you have that done! Now onto the fun...and...tedious part. Making all of the drop beads and fringe! At this point your hoop may have lost some of its round shape. No worries, just slide it back onto your bottle to reform it back into a round shape. You can do this as often as you need to until we get to the step where we attach the center inside cross wire and beads.
Step 4Create all of the drops and fringe beads Now you'll want to create an assembly line and craft all of the drop beads and fringe for both earrings. While you could use head pins to attach all of the beaded fringe, to save money I just used my plain soft gold wire, which I fold over on the ends with round pliers and pinch loop tight to hold my seed beads in place. This is your choice, if you want to use headpins you will need three headpins per drop bead to attach three "fringe" sections to each one (72 headpins total). Make the bead drop wire forms Cut 24 lengths of gold wire (about 1.5 inches long), and create a closed loop on the bottom of each with round nose pliers. These will become the citrine and crystal bead drops, and at the bottom of each drop you will attach a beaded fringe. Don't attach the citrine and crystal beads yet as it is easier to attach all the fringe first, then attach the beads to the earrings. Make the fringe wires Cut 72, 1 inch lengths of gold wire (unless you are using head pins) and loop over and pinch the wire on the bottom to hold seed beads in place so they don't fall off. This is an inexpensive way to make your own "head pins". I actually like the look of the added gold wire at the bottom of each bead, but if you want a neater more finished appearance, use head pins instead. Make the beaded fringe Let's make the fringe. We will attach three beaded fringes to each bead drop. Using your seed beads, slide two beads onto the wire or headpin, then attach them to a bead drop form (bottom closed loop) using pliers. Do this again so you now have two, two-bead fringes attached to your bead drop. Slide three seed beads (use a different color on the bottom beed) onto the wire or headpin, and attach this one in the middle. This makes a 2-3-2 seed bead fringe "spray" on the bottom of each beaded drop. Repeat this with all your wires until you have attached fringe to the bottom of all 24 bead drops. TIP - This part will take a long time, so make sure you are in a comfortable chair, with good lighting (and maybe turn on the TV or stereo). Remember to take breaks every hour to fight fatigue and rest your eyes. Assembly Line:
Step 5Attach center wire to hoop form Now we will create the center wire "cross bar" for the three drop beads in the center of our hoop. This is a good time to make sure your forms are still round, so slide them back over your bottle form and round them out again one last time. Cut a two inch length of your thicker gold wire. This is more wire than you need but you may need to adjust and make a few cuts, so give yourself the extra bit to save frustration. Make a round loop to hook the wire on the top side of the hoop form. Make a soft dip or rounded bend in the center of the wire using your fingers. You can make this rounded as much or as little as you want to. Line the other side up in the same place on the wire hoop form, and make another round loop to hook the wire on at that spot. Adjust the wire as needed to get the desired look, and repeat on the other earring. Cut off remaining wire ends and tuck in tightly. This part is just a little challenging to get "just right", but you'll be done with it in just a few minutes! Step 6Attach beaded drops and finish the earrings! Now we are in the final stretch and the most satisfying part. Let's attach all the bead drops to our earrings. Slide one seed bead, one crystal or citrine bead, and one seed bead onto each wire. Attach the beads to the earrings (through the loops you created with the fine gold wire, making sure you go between the two seed beads) using closed wire loops to attach them so they don't fall off. Follow my pattern below to alternate citrine and crystal beads in the design. Top - Citrine, Crystal, Citrine Bottom - Citrine, Crystal, Citrine Citrine, Crystal, Citrine, Citrine, Crystal, Citrine
Finally, attach the final crystal bead at the top, and attach the earring to your earring component with a round loop, and your stunning chandeliers are completed and ready to wear. Enjoy!
|
Home How To Make Jewelry Jewelry Basics Jewelry Projects Designer's Gallery Jewelry Supply Jewelry Business Jewelry Books and More Contact Me Privacy Statement Copyright 2006 Smart Sisterz LLC |

Join our Newsletter for more free jewelry design projects and tips each month.
Love earrings? You might like this book!