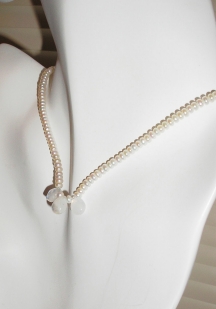
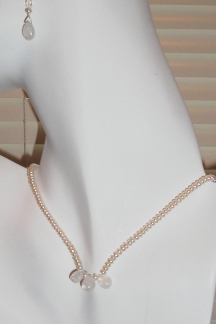
Pearl and Moonstone Necklace
About This DesignTime: Approximately 20-30 minutes Level of Difficulty: All Levels (with Basic Wire Wrapping Knowledge) Cost: Varies, depending on materials selected. Approximately $15-20 as shown. This pretty pearl and moonstone necklace is very simple to make. Opal-like moonstone has an inner glow and catches the light--reflecting blue and pink...so pretty, and what could be better than to pair this with shimmering pearls? I used tiny little button pearls and three briolette moonstone beads to create a very simple feminine design that can be worn comfortably with anything. From a summer wedding, to a casual bar-b-que with friends, this design works! Want to learn how to make this necklace, or a variation of it for yourself? Let's get started!
Step 1Gather Supplies Notes: Decide how long you want your handcrafted necklace to be. I went for a choker length of about 15.5 inches (about 40cm).
Need Supplies? Check my Jewelry Supply pages to find what you need!
Step 2Thread beads onto wire Tie a knot on one end of the wire, or place some tape over the end, and string all of your beads onto the wire. Check the length and overall design and make adjustments by adding, removing, or re-positioning beads until you are happy with the look of the bracelet. You can do this first on a bead design board if you prefer or use a ruler. I strung my three moonstone briolette beads right in the center of my design, with one pearl separating each bead. Step 3Attach the clasp Untie your knot or remove the tape. Slide a crimp bead onto the end of wire, and thread the wire through the loop on the clasp, and back through your crimp bead. Crimp the bead flat or use a crimping tool to close the crimp. Follow the How to Use Crimp Beads instructions if you are not familiar with this technique. TIP - For an even more finished look, cover your crimp beads with the new crimp bead covers! That's it. Your great new moonstone and pearl necklace is ready to wear!
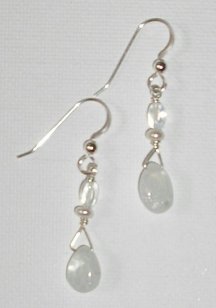
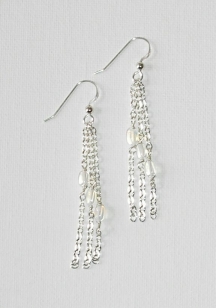
Matching Jewelry SetTry one of the matching the moonstone and opalite earrings projects! Moonstone Briolette Earrings Opalite Earrings with Chains
|
Home How To Make Jewelry Jewelry Basics Jewelry Projects Designer's Gallery Jewelry Supply Jewelry Business Jewelry Books and More Contact Me Privacy Statement Copyright 2006 Smart Sisterz LLC |