
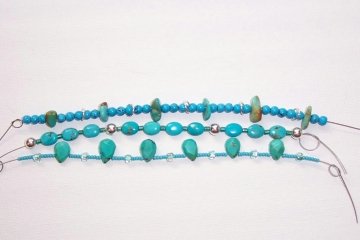
Turquoise and Silver Bracelet
About This DesignTime: Approximately 1 hour Level of Difficulty: Beginner - All Levels Cost: Varies, depending on materials selected. Approximately $25-35 as shown (depends on the quality and quantity of genuine turquoise beads used). Perfect for summertime, or any time of the year. Inspired by a recent road trip through the Southwest, this bracelet features three gorgeous strands of bright turquoise beads mixed with silver accents, and seed beads. You will love this eye-catching bracelet and will get loads of compliments when you wear it. Want to make this bracelet, or a variation for yourself? Let's get started!
Step 1Gather your supplies
Need Supplies? Check my Jewelry Supply pages to find what you need!
Step 2String all seed beads and turquoise beads on wire We will string three stands of flexible beading wires with beads. Tie a knot on one end of the wire, or place some tape over the end, and string all of your beads onto the wire. Check the length and overall design and make adjustments by adding, removing, or re-positioning beads until you are happy with the look of the bracelet. You can do this first on a bead design board if you prefer, but I always like to wrap a bracelet around my wrist just to check the look and fit. Make sure you account for the added length of the clasp and extender as it could add up to an inch or more to your bracelet. Be creative and use your beads to come up with three different patterns, mixing sterling silver beads, turquoise beads, and seed beads. Lay your design on a bead board or beading cloth, and rework until you are happy with the effect. Make sure all three strands are exactly the same length and add or remove beads if necessary. TIP - You can start a bracelet by attaching the clasp to one end first, However, if you are unclear about your final design or the finished bracelet length, it is best to simply tie a knot or place some tape over the end of the jewelry wire, string your beads, and once you are happy with the design and length, attach the clasps to the ends. This way, if you find you need to subtract or add beads you can just remove the tape or knot and work from either end without having to cut off your clasp and start the whole thing over!
Step 3Crimp beads and attach clasp and extender chain Now we will use a crimp bead to close the ends of each wire and attach to the clasp piece on one end, and the extender chain on the other. We are working with multiple strands, so you can use a crimp bead for each strand. Untie your knot or remove the tape. Slide a crimp bead onto the end of wire, and thread the wire through the loop on the clasp, and back through your crimp bead. Crimp the bead flat or use a crimping tool to close the crimp. Follow the How to Use Crimp Beads instructions if you are not familiar with this technique. Do the same thing on the other end to attach the extender chain (if you are using one). TIP - For an even more finished look, cover your crimp beads with the new crimp bead covers! Step 4Attach charms to extender chain I used a pre-made extender chain clasp, and the chain on the extender was way too long for a bracelet so I clipped off the last few inches using flush cutters. Now, let's attach the charms to the other end of the chain. Use whatever beads you like to make three beaded charms. Slide the three bead charms onto headpins, and attach them to the last loop in your chain using round nose pliers to create a loop.
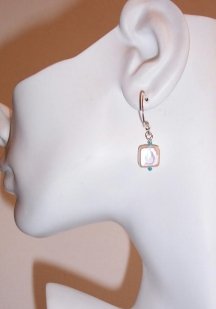
That's it! Your beautiful bracelet is ready to wear or give to someone as a special gift. Matching Jewelry SetThis bracelet looks great paired with other turquoise jewelry. Try these additional jewelry projects. Square Pearl Earrings
|
Home How To Make Jewelry Jewelry Basics Jewelry Projects Designer's Gallery Jewelry Supply Jewelry Business Jewelry Books and More Contact Me Privacy Statement Copyright 2006 Smart Sisterz LLC |


Join our Newsletter for more free jewelry design projects and tips each month!
Love bracelets? Check out this great book!