
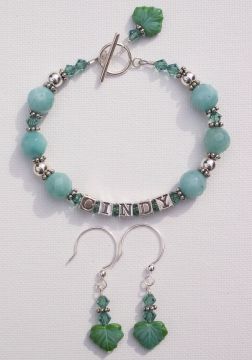
Personalized Mothers Bracelet
About This DesignTime: Approximately 30 minutes - 1 hour Level of Difficulty: Beginner - All Levels Cost: Varies, depending on materials selected. Approximately $20-30 as shown. This easy personalized mother's bracelet is a favorite project! You can make personalized name mothers bracelet, a grandmother's bracelet, baby bracelet, or a friend bracelet. Use one or more strands of beading wire to create more than one name. Attach a favorite charm to the clasp. The possibilities are endless with your imagination and some good beads. IDEA: Want to make a custom Baby name or Mommy Bracelet? Simply attach a baby booties charm instead of the leaf accent bead. Here are some great baby booties charms for sale right now: Baby Booties Charms for Sale on eBay Want to make this bracelet, or a variation for yourself? Let's get started!
Step 1Gather your supplies
Need Supplies? Check my Jewelry Supply pages to find what you need! Step 2String beads on wire Tie a knot on one end of the wire, or place some tape over the end, and string all of your beads onto the wire. Alternate your bead sizes and shapes to make your design more interesting. Check the length and overall design and make adjustments by adding, removing, or re-positioning beads until you are happy with the look of the bracelet. You can do this first on a bead design board if you prefer, but I always like to wrap a bracelet around my wrist just to check the look and fit. If you like my pattern, follow this stringing order:
TIP - You can start a bracelet by attaching the clasp to one end first, However, if you are unclear about your final design or the finished bracelet length, it is best to simply tie a knot or place some tape over the end of the jewelry wire, string your beads, and once you are happy with the design and length, attach the clasps to the ends. This way, if you find you need to subtract or add beads you can just remove the tape or knot and work from either end without having to cut off your clasp and start the whole thing over! This is especially important when working with name bracelets because not all names are the same length.
Step 3Attach the bracelet clasp Untie your knot or remove the tape. Slide a crimp bead onto the end of wire, and thread the wire through the loop on the clasp, and back through your crimp bead. Crimp the bead flat or use a crimping tool to close the crimp. Follow the How to Use Crimp Beads instructions if you are not familiar with this technique. TIP - For an even more finished look, cover your crimp beads with the new crimp bead covers!
Step 4Create and attach the charm Next we will make a little dangle charm from the leaf bead. Slide a leaf bead (or your choice of decorative bead) onto a headpin, then add a Bali spacer bead, then a crystal. Use your round nose pliers to create a loop. Attach the loop to the round part of the toggle clasp so that it slides and hangs freely. That's it!
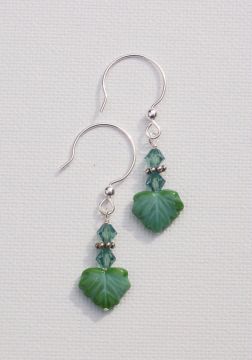
Matching Jewelry SetTry these matching earrings for a complete set! Wouldn't this make a great gift for mother's day jewelry, or a birthday made with mom's birthstones? Leaf Bead Earrings
|
Home How To Make Jewelry Jewelry Basics Jewelry Projects Designer's Gallery Jewelry Supply Jewelry Business Jewelry Books and More Contact Me Privacy Statement Copyright 2006 Smart Sisterz LLC |


Hot off the presses! - Start Your Own Home Jewelry Party Business Today!
Join our Newsletter for more free jewelry design projects and tips each month!
More Ideas: Use children's birthstone colored beads to further customize this bracelet design. Instead of Amazonite beads for example, you could use Swarovski crystal beads in birthstone colors. See this color chart for more information.
What's New?
Join our Newsletter for more free jewelry design projects and tips each month!